
How to stabilize a tripod for photography?
As an Amazon Associate, I earn from qualifying purchases.
How to stabilize a tripod for photography?
A tripod is one of the most important tools in photography, but simply setting it up doesn’t guarantee sharp photos. Wind, uneven ground, vibrations, improper technique, and poor tripod design can all introduce camera shake. Learning how to stabilize your tripod helps you capture crisp images during long exposures, landscapes, wildlife, astrophotography, macro photography, and video recording.
Table of Contents
Why Tripod Stability Matters
Even tiny vibrations can ruin image sharpness.
A stable tripod helps:
- Produce sharper long-exposure images
- Improve night photography
- Increase macro image detail
- Reduce camera movement while filming
- Improve panorama stitching
- Keep telephoto lenses steady
- Allow lower ISO settings
- Capture cleaner HDR brackets
The longer your shutter speed or focal length, the more stability matters.
What Causes Tripod Shake?
Several factors contribute to instability.
Wind
Strong winds push against:
- Camera body
- Lens
- Tripod legs
- Ball head
- Center column
Long telephoto lenses act like sails, catching even light breezes.
Soft Ground
Grass, mud, sand, snow, or loose gravel allow tripod legs to sink or shift during exposure.
Uneven Terrain
When tripod legs aren’t firmly planted, the camera can slowly tilt or vibrate.
Touching the Camera
Pressing the shutter button introduces movement.
This becomes noticeable with exposures slower than about 1/30 second.
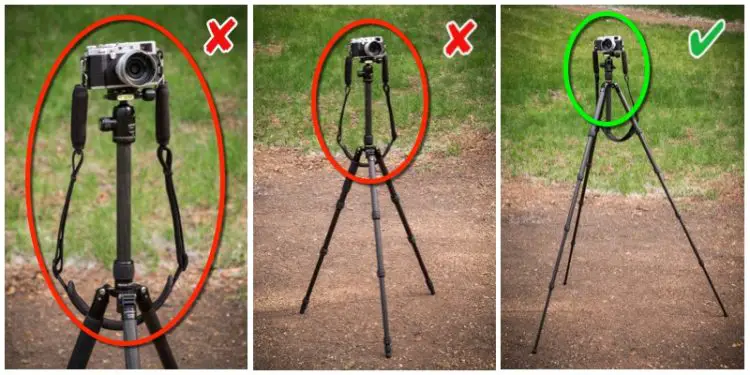
Center Column Extension
The center column is often called the weakest part of a tripod.
Extending it:
- Raises the center of gravity
- Increases flex
- Amplifies vibrations
Keeping the center column lowered provides much greater stability.
Heavy Lens Movement
Large telephoto lenses shift weight forward.
Without proper balancing, the tripod head may flex or slowly droop.
Choose the Right Tripod
Not every tripod offers the same stability.
Consider:
Material
Carbon Fiber

Pros
- Ideal for travel
- Doesn’t become extremely cold
Excellent vibration damping - Lightweight

Cons
- Higher cost
Aluminum
Pros
- Strong
- Durable
- Affordable
Cons
- Transfers vibration more easily
- Heavier
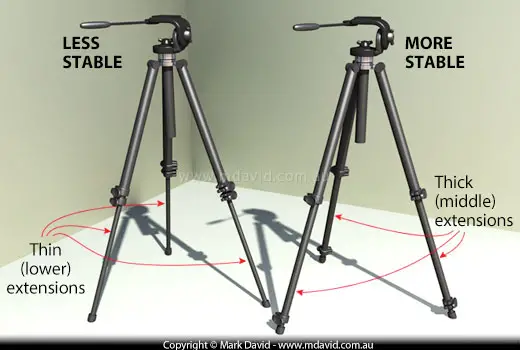
Leg Diameter
Thicker legs generally mean:
- Better rigidity
- Less flex
- Better wind resistance
Professional tripods often use larger-diameter upper leg sections.
Leg Sections
Tripods with fewer leg sections are usually more stable.
Example:
- 3-section legs
- More rigid
Compared to:
- 5-section travel tripod
- More joints
- Slightly more flex
Proper Tripod Setup
Correct setup greatly improves stability.
Spread the Legs Fully
A wider stance lowers the center of gravity.
Benefits include:
- Better balance
- Improved wind resistance
- Reduced tipping
Keep the Thickest Sections Extended
Extend upper leg sections first.
Leave the thinnest bottom sections collapsed whenever possible.
This dramatically reduces flex.
Avoid Extending the Center Column
Whenever practical:
- Raise the tripod using the legs
- Keep the center column down
Only extend the column if absolutely necessary.
Position the Legs Properly
If using:
- Heavy DSLR
- Mirrorless with telephoto
- Large lens
Aim one tripod leg directly under the lens.
This better supports the forward weight.
Stabilize on Different Surfaces
Concrete
Rubber feet usually provide sufficient grip.
Grass
Press the legs firmly into the soil.
Sand
Spread the legs wider.
Allow them to settle before shooting.
Some tripods include wide sand feet.
Snow
Push legs deeper into packed snow.
Use snow baskets or larger feet if available.
Rocks
Adjust each leg independently until the tripod feels solid.
Add Weight to the Tripod
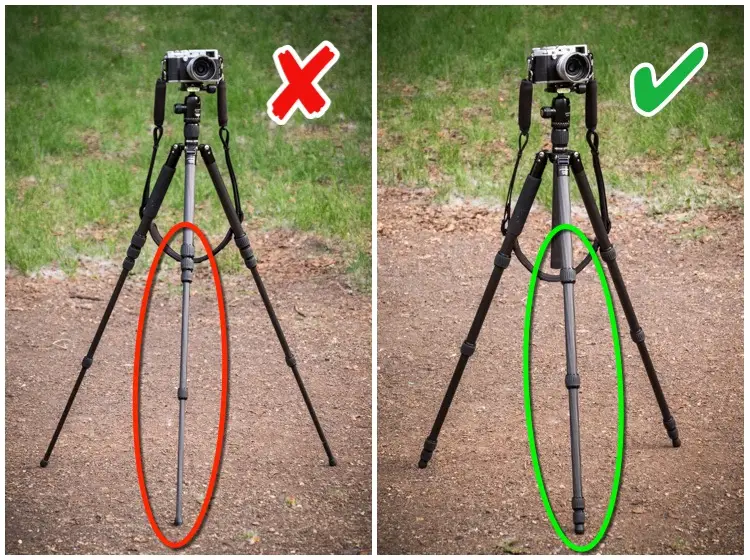
Many tripods include a center hook.
You can hang:
- Camera bag
- Sandbag
- Backpack
- Dedicated weight bag
Extra weight lowers the center of gravity.
However:
- Avoid allowing the bag to swing.
- Rest it gently on the ground if possible.
- In strong wind, swinging weight can increase vibration.
Use a Remote Shutter Release
Touching the shutter button introduces movement.
Better options include:
- Wired remote
- Wireless remote
- Smartphone app
- Built-in interval timer
Even inexpensive remote releases make a noticeable difference.
Use the Self-Timer
If no remote is available:
Use:
- 2-second timer
- 5-second timer
This lets vibrations settle before exposure begins.
Enable Mirror Lock-Up (DSLR)
DSLR mirrors create vibration when flipping upward.
Mirror Lock-Up separates:
- Mirror movement
- Exposure
This produces noticeably sharper long exposures.
Mirrorless cameras do not have mirror slap.
Electronic First Curtain Shutter
Many modern cameras include:
- Electronic First Curtain
- Electronic shutter
These reduce mechanical vibration during exposure.
Turn Off Image Stabilization on a Tripod
Many manufacturers recommend disabling stabilization when the camera is completely stable.
Otherwise:
Some stabilization systems may introduce tiny movements while searching for vibration.
However:
Some modern lenses automatically detect tripod use.
Always consult your camera or lens manual.
Shield the Tripod From Wind
Simple techniques include:
- Stand between tripod and wind
- Use rocks as barriers
- Shoot behind trees
- Use buildings for shelter
Reducing direct wind exposure significantly improves stability.
Avoid Touching the Tripod
During exposure avoid:
- Leaning on tripod
- Adjusting camera
- Holding lens
- Pressing legs
Wait until the exposure finishes.
Use Proper Ball Head Tension
Loose heads may:
- Sag
- Drift
- Vibrate
Proper tension prevents unwanted movement while still allowing smooth adjustments.
Stabilizing for Telephoto Photography
Long focal lengths magnify vibration.
Helpful techniques:
- Use a sturdy tripod
- Mount lens via tripod collar
- Use remote release
- Add tripod weight
- Avoid center column extension
- Use faster shutter speeds when possible
Telephoto wildlife photography benefits greatly from tripod stabilization.
READ ALSO: Best Camera for Video
Stabilizing for Macro Photography
Macro photography magnifies even microscopic movement.
Recommendations:
- Use a focusing rail
- Shoot indoors when possible
- Block wind
- Use electronic shutter
- Use remote release
- Keep tripod very low
Stabilizing for Long Exposure Photography
Essential checklist:
- Heavy tripod
- Low center column
- Remote trigger
- Wind protection
- Added weight
- Stable footing
- Low ISO
- Manual focus
Stabilizing During Video Recording
Video reveals vibrations even more clearly.
For smoother footage:
- Lock pan and tilt securely
- Use a fluid video head
- Avoid touching tripod during recording
- Place tripod on firm ground
- Add weight when outdoors
Helpful Accessories
Useful stabilization accessories include:
- Sandbags
- Tripod weight hook
- Remote shutter release
- Spiked feet
- Snow feet
- Ground spreader
- Lens collar
- Vibration-damping pads
- Leveling base
- Bean bag for additional support
Common Tripod Stabilization Mistakes
Avoid these common errors:
- Extending the center column fully
- Using the thinnest leg sections unnecessarily
- Forgetting to tighten locks
- Hanging a bag that swings freely
- Standing on unstable ground
- Touching the camera during exposure
- Ignoring strong wind
- Using an undersized tripod for heavy equipment
- Failing to balance a long lens
Tripod Stabilization Methods Comparison
| Method | Stability Improvement | Cost | Best For |
|---|---|---|---|
| Lower center column | Excellent | Free | All photography |
| Add weight | Excellent | Low | Windy conditions |
| Remote shutter | Excellent | Low | Long exposures |
| Self-timer | Very Good | Free | General photography |
| Carbon fiber tripod | Excellent | High | Travel & landscape |
| Wider leg angle | Very Good | Free | Uneven terrain |
| Wind shielding | Very Good | Free | Outdoor photography |
| Mirror Lock-Up | Excellent | Free | DSLR users |
| Electronic shutter | Excellent | Free | Mirrorless cameras |
| Spiked feet | Good | Low | Grass & dirt |
Pros and Cons of Tripod Stabilization Techniques
Pros
- Sharper images
Better long exposures
Improved low-light photography
More reliable panoramas
Better macro detail
Cleaner video footage
Greater confidence with heavy lenses
Reduced motion blur
Cons
- Additional setup time
Extra accessories add weight
Premium tripods can be expensive
Sandbags and weights reduce portability
Wind protection isn’t always available in open environments

Related Posts

Lume cube panel mini (review)
6 Best LP-E17 Replacement Batteries in 2024 (Honest Guide)