How To Fix The Camera Connection Error On GoPro Webcam?
As an Amazon Associate, I earn from qualifying purchases.
Are you using you’re GoPro as a webcam for an institutional and professional meeting? Is your computer suddenly not recognizing your Gopro and is it showing a “Camera Connection Error”?
To fix the issue you need to change the “internal graphics processor” from the camera app settings will fix the error easily.
So in this article, I will get you through the real reason behind this error and show you the process of how to fix the “Camera Connection Error” on Gopro Webcam.
Why Is “The Error” Happening?

If your computer fails to detect it, it shows the “Camera Connection Error”.
The main reason is not selecting the internal graphics processor for the camera.
The camera works with the Internal Graphics Processor. So if you use an Intel CPU the Integrated graphics processor will be the Intel UHD graphics. For AMD it’s Radeon Graphics.
Some of the other reasons could be:
- Your Antivirus Software is blocking your camera connection.
- The Camera Application is not properly installed
- You’re using an old GoPro
- Your camera firmware is not up to date
- You’re Windows 10 is not updated
- Faulty cable
Also, the virus in your system can cause such an error.
How to Fix?
These are the easy steps to fix the camera connection error on Gopro:
Step 01:
Update your GoPro to the latest firmware.
To update you have to download and install the GoPro App on your mobile device. Keep your camera battery fully charged and pair the camera with GoPro App. Once both are paired follow the steps shown on the screen to update automatically.
The software download screen will look like this

During the update, your camera will turn on and off automatically. And after the update is completed the camera will return to normal.
In Desktop, you have to update the camera firmware manually. Check the procedures below:
- To update you will need a fully charged battery, Micro SD card, SD card adapter, and a computer.
- Get the serial number from the battery compartment or you can have the number from the camera’s “Preference” > “About” > “Camera info”.


- Go to gopro.com/update and register your camera with the serial number.
- Download the update. And whenever you check it will be the latest firmware update for the camera.
- Connect the micro SD card to your computer and extract the download file and transfer it to the SD card.
- Insert the SD card and fully charged battery into the camera.
- Turn on the camera and run the update.
To update your GoPro manually click on this link to have thorough instructions. Or watch this video.
Note: Make sure the SD card you use to update the camera is fully compatible with the GoPro. Otherwise, you might have trouble updating.
Step 02: Install “GoPro Webcam” on your PC
For both Mac and Windows users download the “Gopro webcam” app from here.
After installing, the Gopro Webcam icon will look like this.

Step 03: “Gopro Connect”
In your GoPro, go to “Connection Settings” > “USB Connection” > “Gopro Connect”.

Step 04:
Double click the “Gopro Webcam” icon and you will find an icon like this in the taskbar. Make sure you search in the hidden apps if you don’t find the “GoPro Webcam” Icon.

Step 04:
Take the battery out from your GoPro to prevent overheating. Then connect the GoPro via USB cable. And turn your camera ON.
An Error message like this may show up on your notification bar.
Or, you might find a green screen like this.

This means the app has selected the wrong graphics driver to connect to the computer screen.
Step 05:
A lot of us have to change the graphics processor to connect the GoPro with our computer system. Because it requires the Internal Graphics Processor as I mentioned earlier.
If the PC has an external Graphics card, it is pretty normal to have the connection error issue.
Because the external graphics processor is more powerful to use as the default graphics processor than the integrated ones.
Right-Click the “Webcam app” and select Graphics Processor.
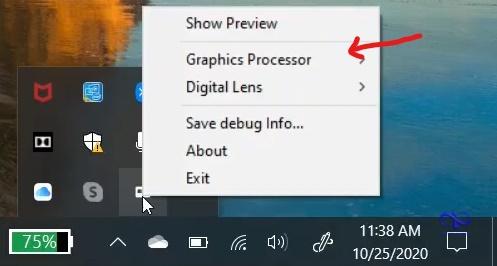
And select “Intel UHD Graphics”

If you are using an AMD processor for your Desktop PC or Laptop you have to choose “Radeon Graphics”
If you’re a Mac user right-click the “Gopro Webcam” icon and select “Preferences” and select the “Intel UHD Graphics” if your Mac is using an Intel processor.

Step 06:
Open the “Gopro Webcam” and you will see a blue dot at the top right corner of the icon. This will indicate the Gopro has been connected successfully.

Step 07:
Click the “Gopro Webcam” and select preview. Then you should see your camera display on your screen. And you are using the GoPro as a webcam now.
If you still find trouble, restart your computer and open the app again.
Which GoPro Can Be Used As A Webcam?
GoPro’s latest flagship the Hero 10 is easily compatible with the webcam camera app.
Also, Hero 9, Hero 8, and Hero 7 can act as a webcam with the app. But you might find a hard time using the Hero 7 as a webcam. Because it has a slower processor and connection.
The “GoPro Webcam” Software makes these four-camera use as a webcam without any third-party software or any kind of extra hardware.
Conclusion
Thanks to modern technology, a GoPro Hero camera can use as a webcam. Who doesn’t want to stream and have video conferences in HD and wide-angle lenses, right? But many of us don’t know how to use it or what to do when it shows any kind of error.
I have tried to cover all the necessary and basic information regarding the connection error. The article directs you on how to fix the “Camera Connection Error” on the GoPro webcam and the main reason behind it.
Related Posts
Related Posts

DJI Mini 3 review
![How to charge GoPro 10? [4 methods & 10 tips]](https://cameratroop.com/wp-content/uploads/2024/02/How-to-charge-GoPro-10-4-methods-10-tips-660x470.jpg)
How to charge GoPro 10? [4 methods & 10 tips]